

If you’re here, you’ve likely chosen Brevo (formerly Sendinblue) as your email marketing platform. Smart choice! It’s a powerful, budget-friendly tool perfect for growing businesses. But logging in for the first time can feel like stepping into the cockpit of a jet when you’ve only flown a kite.
Don’t worry—we’ve got you.
At ZenFix Academy, we believe in “Learn. Build. Grow smarter.” This guide is designed specifically for beginners, stripping away the jargon to give you a clear, actionable walkthrough of the Brevo dashboard and the essential setup steps to get your first campaign ready. Let’s turn that cockpit into a comfortable driver’s seat.
Why Brevo? A Deep Dive into the “Why”
Before we move into the technical setup, let’s take a moment to understand why Brevo is effectively the industry standard for getting started. When you are looking at the landscape of email marketing tools, it is easy to get overwhelmed by the sheer number of options. You have legacy giants, expensive enterprise software, and bare-bones tools that do very little. Brevo sits in a unique sweet spot.
Unlike many platforms that hide their best features behind expensive paywalls, Brevo offers a generous free plan that is genuinely usable for a real business. It includes access to powerful tools like marketing automation and a Customer Relationship Manager (CRM). For small business owners and new marketers, this makes it the perfect “sandbox” environment. You can learn the ropes of audience building and campaign strategy without a massive upfront investment or the fear of breaking the bank if you make a mistake.
Our goal here is simple. We want to help you move from “account created” to “email sent” with total confidence. To do that, you need to understand the three pillars that make this platform distinct: the pricing model, the automation capabilities, and the built-in data management.
The Pricing Structure Difference
The biggest friction point for new marketers is almost always cost. Most email marketing platforms operate on a subscriber-based pricing model. This means that as soon as you add a contact to your list, you pay for them, even if you never send them an email. If you have a list of 2,000 people but only email them once a month, you are still paying a premium just to house that data.
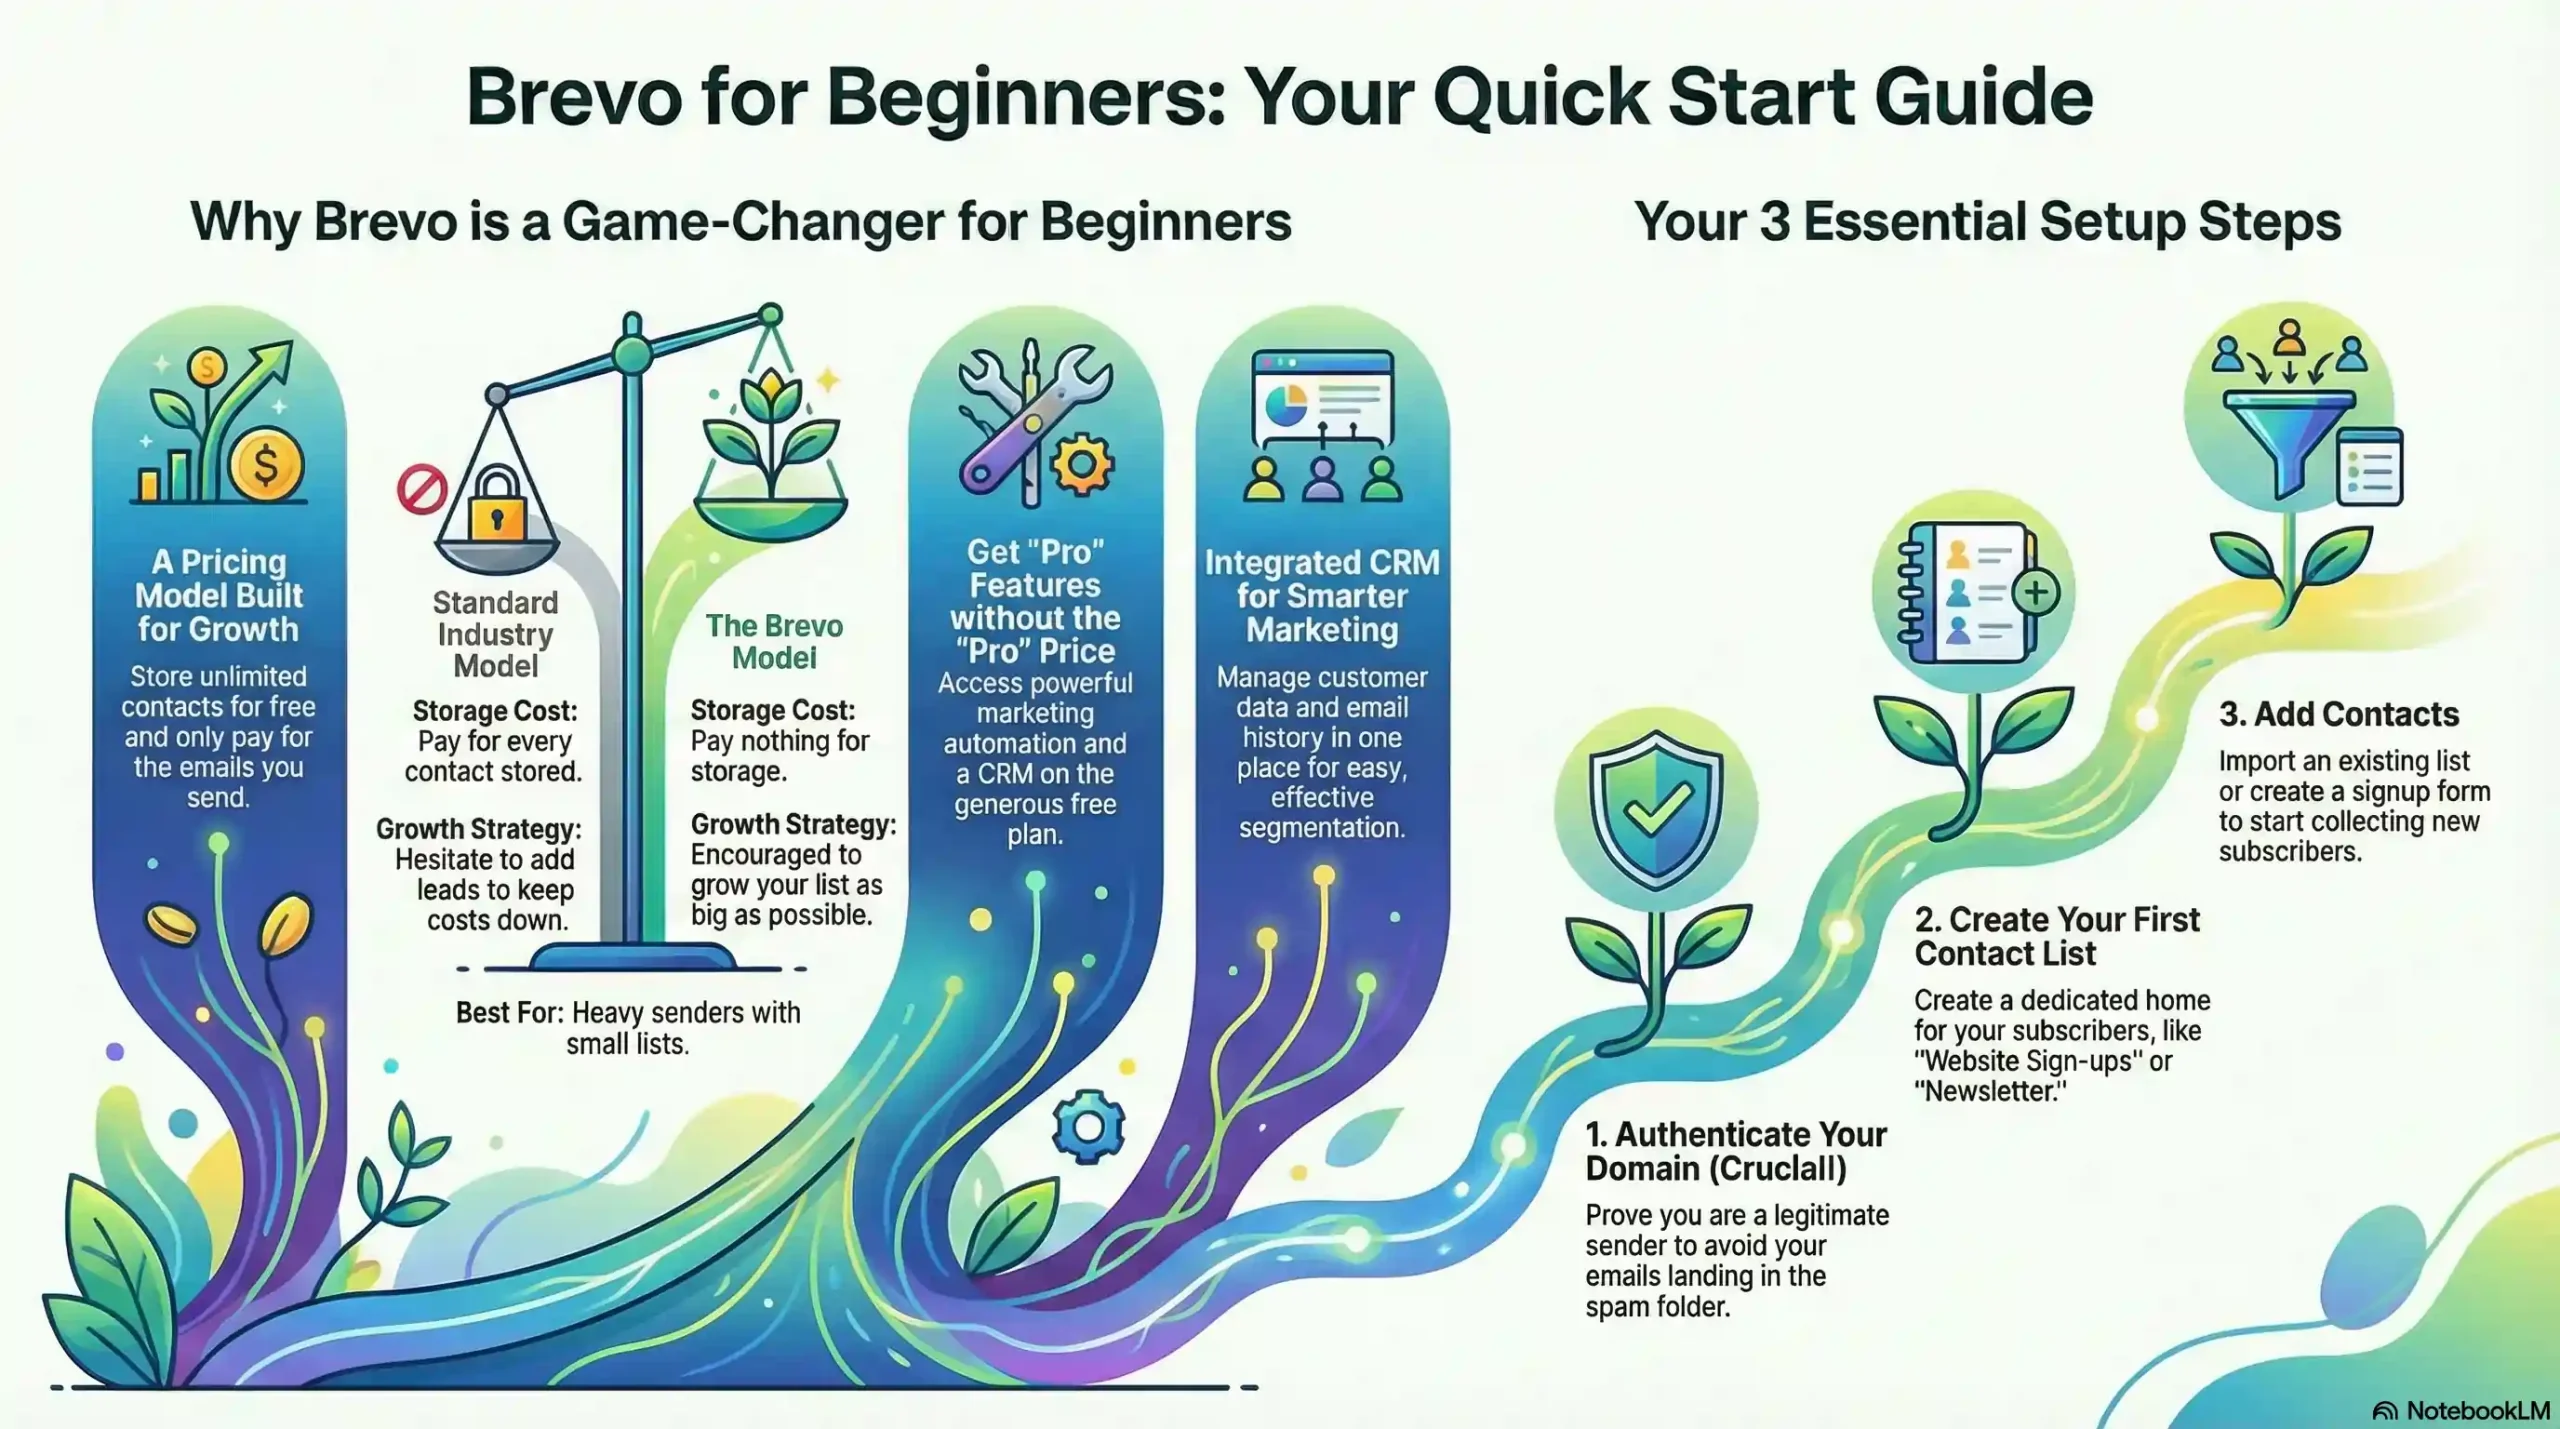
Brevo flips this model. They charge based on the number of emails you send rather than the number of contacts you have. You can store an unlimited number of contacts for free. This is a game-changer for businesses that are in the growth phase. It allows you to collect leads aggressively without worrying that your monthly bill will spike before you have generated any revenue from those leads.
Here is a quick breakdown of how this fundamental difference impacts your strategy:
Subscriber-Based vs. Sending-Based Models
| Feature | Standard Industry Model | The Brevo Model |
| Storage Cost | You pay for every contact stored. If your list grows, your bill goes up immediately. | You pay nothing for storage. You can have unlimited contacts on the free plan. |
| Growth Strategy | You might hesitate to add new leads to keep costs down. | You are encouraged to grow your list as big as possible since storage is free. |
| Sending Volume | usually unlimited sending, but capped by the size of your list. | Your list size is unlimited, but you have a daily or monthly cap on how many emails you send. |
| Best For | Heavy senders who email a small list every single day. | Growing businesses that want to build a large audience without immediate overhead. |
Access to “Pro” Features
Beyond the pricing, the feature set on the entry-level tier is surprisingly robust. Usually, when you sign up for a free email tool, you get a basic newsletter builder. You can send a blast to everyone, but you cannot do anything smart with it.
Brevo includes marketing automation on its free tier. This is significant. Automation allows you to set up sequences that run in the background while you sleep. For example, when someone signs up for your newsletter, you can automatically trigger a “Welcome” email to go out immediately, followed by a “Best Content” email three days later.
On most other platforms, logic-based automation like this is reserved for paying customers. By giving you access to this early on, Brevo allows you to build sophisticated customer journeys from day one. You are not just blasting emails; you are building a system.
The Hidden Power of the CRM
The third reason we recommend this route is the CRM. Email marketing does not happen in a vacuum. You need to know who your customers are, what they bought, and when they last interacted with you.
Brevo includes a CRM (Customer Relationship Management) system by default. This means you do not need a separate spreadsheet or a different piece of software to keep track of your customer notes. If a customer replies to an email or makes a purchase, that data lives right next to their email address.
Having a CRM integrated with your email tool ensures your data stays clean. You can segment your audience based on their behavior easily. If you want to email only the people who opened your last newsletter, you can do that. If you want to email people who live in a specific city, you can do that too.
Here is a look at the specific tools you get access to and how they translate into practical business benefits:
Practical Application of Brevo Features
| Feature | What It Does | Practical Benefit for You |
| Visual Workflow Editor | Allows you to draw paths for how emails are sent based on user actions. | You can create a “Welcome Series” that nurtures new leads automatically without you lifting a finger. |
| Advanced Segmentation | Groups your contacts based on criteria like location, behavior, or past purchases. | You stop annoying your audience with irrelevant emails. You send the right message to the right people. |
| Transactional Emails | Handles system emails like password resets or order confirmations. | Ensures your critical business notifications land in the inbox, not the spam folder. |
| SMS Marketing | Allows you to send text messages alongside your emails. | specific time-sensitive offers (flash sales) can reach customers instantly on their phones. |
Reliability and Deliverability
Finally, we have to talk about trust. All the features in the world do not matter if your email lands in the Spam folder. Brevo has a very strong reputation for deliverability. Because they are strict about their sending policies, internet service providers (like Gmail and Outlook) trust emails coming from their servers.
When you are just starting, you do not have a sender reputation yet. Piggybacking on the reputation of a solid platform gives you a head start. It ensures that the beautiful emails you design actually get seen by human eyes.
By combining low financial risk with high-technical capability, Brevo removes the barriers that usually stop people from starting. It invites you to experiment. You can test different subject lines, try out automation, and organize your contact list properly. It provides a professional infrastructure that is ready to scale whenever you are.
Now that we understand the platform’s value, we can move on to the practical steps of setting it up.
Phase 1: The Initial Setup & Onboarding
The first time you log in, Brevo will guide you through an onboarding checklist. Don’t skip this! It’s designed to get the foundational elements of your account securely in place.
1. Complete Your Profile
Fill in your business details accurately. This isn’t just busywork; this information is often legally required at the bottom of your emails (like your physical address) to comply with anti-spam laws.
2. Validate Your Account
Brevo needs to know you’re a real person to prevent spammers from using their platform. This usually involves verifying your email address and sometimes a phone number. It’s a quick step that protects your future deliverability.
3. Choose Your Plan
For most beginners, the Free plan is the right place to start. It allows you to send up to 300 emails per day, which is plenty for testing the waters and building your initial list.1 You can always upgrade later as your needs grow.
Phase 2: De-mystifying the Brevo Dashboard
Once onboarded, you land on the main dashboard. It can look busy, but everything is organized logically. Think of it as the mission control center for your entire marketing operation.
Let’s break down the key areas in the top navigation bar:
1. Home (The Cockpit View)
This is your daily snapshot. Once you start sending emails, you’ll see a high-level overview of your recent campaign performance here—opens, clicks, and operational stats. Right now, it will mostly show your setup progress.
2. Contacts (Your Audience Hub)
This is the heart of your email marketing. Here, you manage your subscribers, organize them into lists, and view individual profiles. A healthy, well-organized contact list is the foundation of successful campaigns. We have deeper dives into audience strategies in our Email Marketing category.
3. Campaigns (Your Broadcast Center)
This is where you create and send one-off emails, like newsletters, product announcements, or sale alerts. You’ll spend a lot of time here designing emails using Brevo’s drag-and-drop editor.
4. Automations (Your 24/7 Marketing Robot)
This is where the magic happens. Automation allows you to set up sequences of emails that trigger based on user actions—like a “Welcome Series” when someone signs up, or an “Abandoned Cart” email if they leave something behind.2 Mastering this is key to “growing smarter.” Check out our guides on building these systems in the Marketing Automation category.
5. Transactional (The System Messenger)
These are different from marketing emails. Transactional emails are one-to-one messages triggered by a system event, like a password reset confirmation, an order receipt, or a shipping notification.3 They are crucial for user experience but have different rules than marketing emails.
6. More ▼ (The Toolbox)
Under this dropdown, you’ll find other powerful Brevo features like Conversations (live chat), Deals (CRM sales pipeline), and Meetings (scheduling tool). As a beginner, you can ignore these for now and focus on mastering email first.
Phase 3: Essential First Steps for Success
Now that you know the lay of the land, let’s take the three most critical actions to get your account ready for sending.
Step 1: Set Up Your Sender & Authenticate Your Domain (Crucial!)
Before you send a single email, you need to tell email providers (like Gmail and Outlook) who you are and that you’re a legitimate sender. If you skip this, your beautiful emails will land straight in the spam folder.
-
Go to your account dropdown in the top-right corner and select Senders & IP.
-
Click on Domains and then Add a Domain.
-
Enter the domain name of your website (e.g.,
yourbusiness.com). -
The Technical Part (Don’t Panic): Brevo will give you some text records (DKIM and SPF).4 You need to copy these and paste them into the DNS settings of your domain host (like GoDaddy, Namecheap, or Bluehost).
Think of it like this: DKIM is a digital signature that proves the email hasn’t been tampered with, and SPF is a guest list telling receiving servers that Brevo is allowed to send emails on your behalf. It sounds scary, but your host’s support team can help you do this in minutes.
For a visual walkthrough of domain authentication, this video is excellent:
Step 2: Create Your First Contact List
You need a bucket to put your subscribers in.
-
Navigate to the Contacts tab.
-
Click on the Lists sub-tab.
-
You’ll see a default list. You can use it, but it’s better to create a new one. Click Add a new list.
-
Give it a clear name like “Master Newsletter Subscribers” or “Website Sign-ups”.
-
Click Create an empty list.
Now you have a home for your future audience!
Step 3: Import Existing Contacts or Create a Signup Form
How do you get people onto that list? You have two main options to start.
Option A: Import Contacts (If you have them)
If you’re moving from another platform or have a legitimate list of customers who have consented to receive emails, you can import them.
-
Go to Contacts and click the Import contacts button on the top right.
-
You can upload a CSV file or copy-paste details. Brevo will walk you through mapping the data (matching “First Name” in your file to the “First Name” field in Brevo).
Option B: Create a Signup Form (If you’re starting from zero)
You need a way to collect emails on your website.
-
Go to Contacts -> Forms.
-
Click Create a new subscription form.
-
Use the drag-and-drop builder to design a simple form asking for an email address and maybe a first name.
-
In the settings, link this form to the list you just created.
-
Once done, Brevo gives you a code snippet to embed on your website.
For more detailed, step-by-step guides on creating high-converting forms, browse our Tutorials category.
Your Next Steps: Build and Grow
Congratulations! You’ve successfully navigated the initial setup. Your dashboard is no longer a scary cockpit, your domain is authenticated for good deliverability, and you have a list ready to welcome new subscribers.
What’s next? It’s time to build.
-
Send your first campaign: Create a simple “Hello” newsletter to introduce yourself.
-
Build a Welcome Automation: Set up a simple workflow that automatically sends a welcome email immediately after someone joins your list. This is the first step in putting your marketing on autopilot.
Remember, you don’t have to figure this all out alone. At ZenFix Academy, we provide the blueprints, checklists, and honest tutorials you need. Be sure to check our Resources category for free templates to speed up your creation process.
Start simple, be consistent, and watch your system grow. You’ve got this.
Frequently Asked Questions (FAQs)
Q: Is the free Brevo plan really enough for a beginner?
A: Absolutely. The 300 emails/day limit is generous for starting out. More importantly, it gives you access to advanced features like automation workflows, which many competitors charge for. It’s the best way to learn without financial pressure.
Q: What happens if I don’t authenticate my domain?
A: Your emails will likely be flagged as spam by providers like Gmail and Outlook. They might not even reach your subscribers’ junk folders; they could be blocked entirely. Domain authentication is not optional for serious marketers.
Q: Can I buy an email list and import it into Brevo?
A: No. Never do this. Brevo’s terms of service (and international anti-spam laws) strictly prohibit using purchased or scraped lists.5 You must have explicit permission from people to email them. Using a bought list will get your account banned and ruin your sender reputation.
Q: What is the difference between a Campaign and an Automation?
A: A Campaign is a manual, one-time broadcast you send to a list at a specific time (e.g., a monthly newsletter). An Automation is a sequence of actions triggered by a user’s behavior (e.g., sending a series of three emails automatically over a week after someone downloads your free ebook).6
Q: Where can I find help if I get stuck?
A: Brevo has an extensive help center.7 But for strategy, practical application, and beginner-friendly guides that connect the dots, stick with us here at ZenFix Academy!
Leave a Reply